
How to Create a Squarespace Blog: Everything You Need to Know (+Tutorial Videos)
Sign up for a free Squarespace trial here! #afflink

Readers of this blog know that I’m a stickler for consistent blogging.
Why? Because SEO-driven blogging is hands down the best way to increase traffic to your site, which opens up numerous doorways for your brand’s growth while also setting up you/your business for stability.
Two very unfortunate common scenarios usually play out though:
Website owners don’t blog, or
They blog about random topics that never get attention or convert
From blog design to making a sidebar and template, to using categories and implementing SEO best practices, my goal for this article is to be a one-stop shop for all you need to know about blogging with Squarespace.
So grab your favorite hot cuppa-somethin’ and let’s get started!
Starting a Squarespace Blog
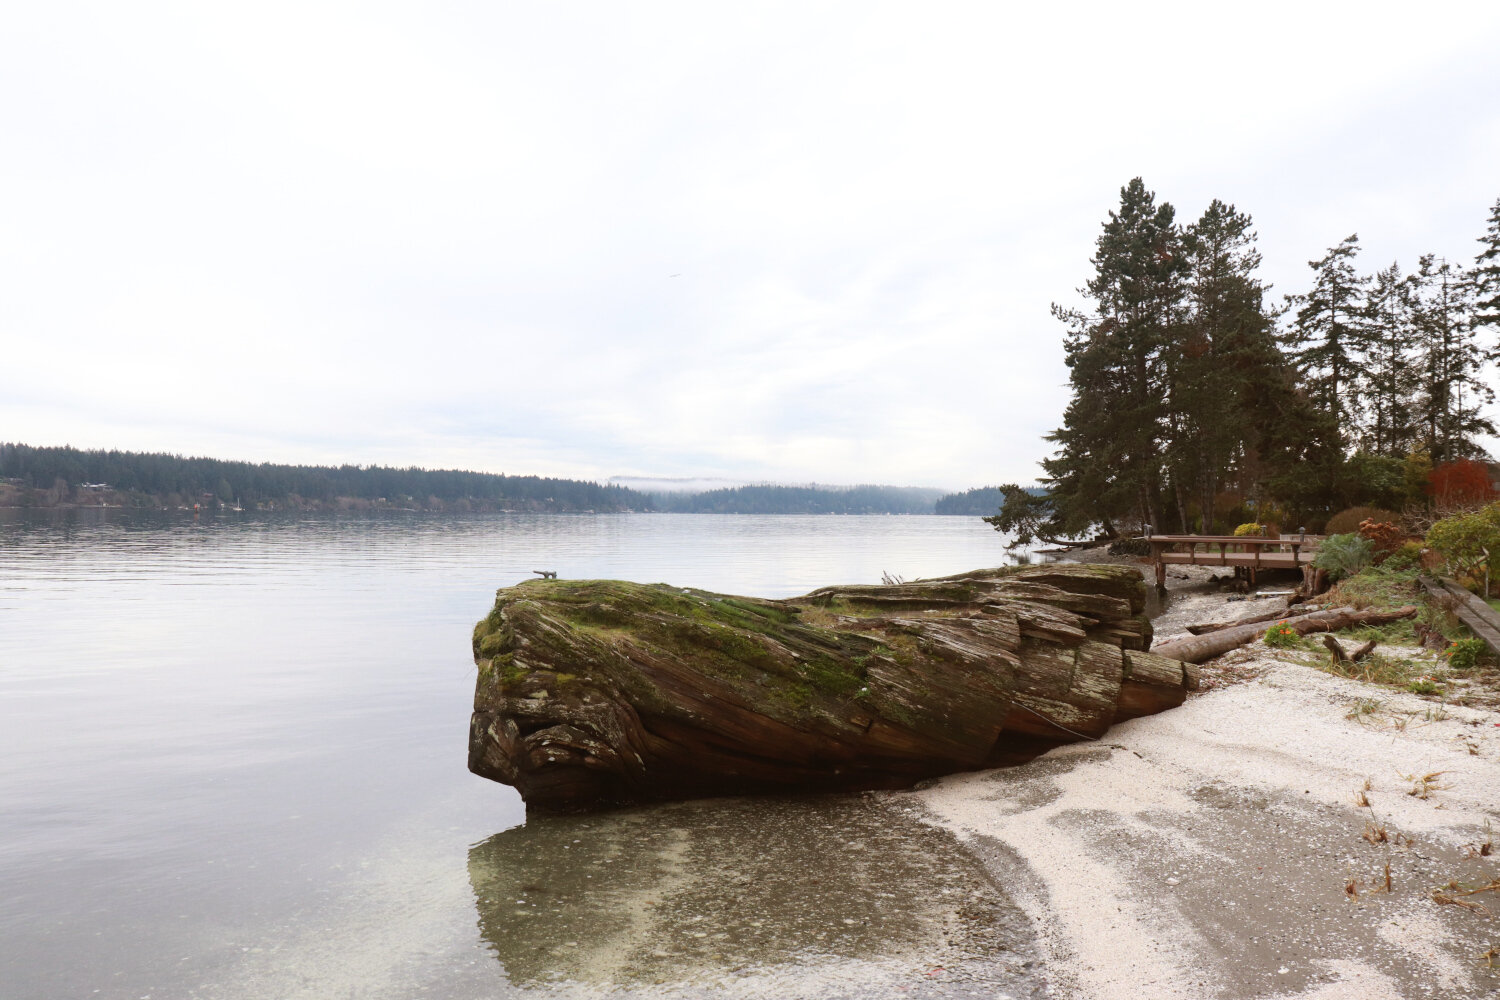
Completely unrelated to this blog post, but still— Any Twin Peaks fans? We recently found ourselves at “The Great Northern” (which is actually Kiana Lodge in Poulsbo, WA ;) That’s the log where Laura Palmer’s body was found above, during high tide.
Does Template Matter?
I say No because you can add a blog to any template, version 7.0 or 7.1.
(By the way, I prefer Squarespace version 7.0 so the instructions in this article will be based on that version)
So no matter the template, you can design your own blog. Template should not restrict you.
I use the Pedro template for pretty much every single website I design, and I recommend it for all website needs simply because it carries so much design customization possibilities with it. You can scrap all the design details and page layouts, like I do, and start from scratch building your website. So if you’re reading this article and haven’t yet designed a website, I can’t recommend Pedro enough. I’ll be using Pedro in all of my instructions in this article.
Creating the blog Itself
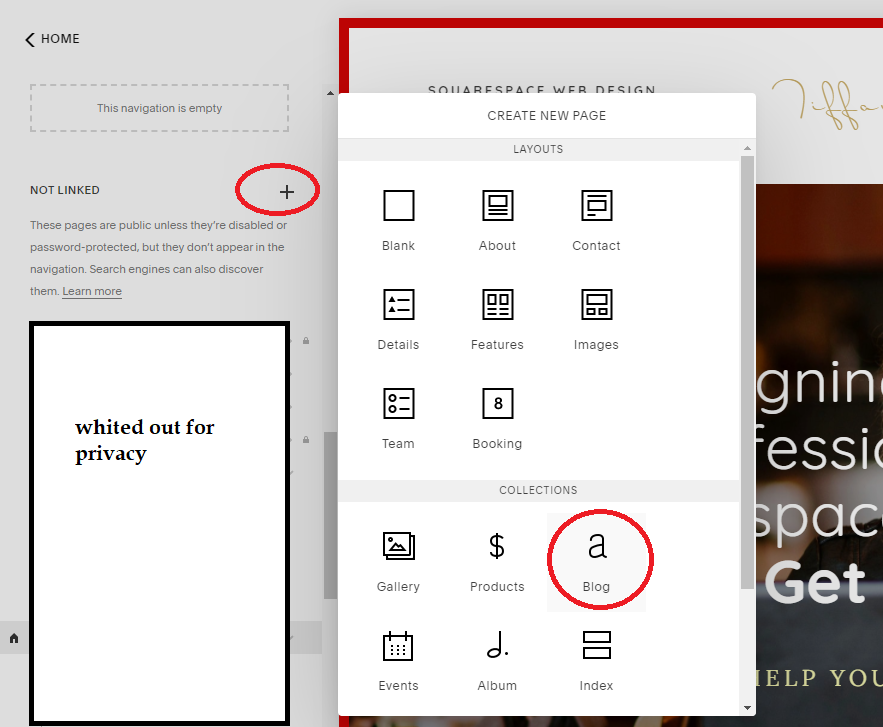
Logged into the backend of your site, from the main Home menu, click on Pages, then scroll down to the Not Linked section (you can easily move your blog to Primary or Secondary Navigation later after you’ve properly prepared it). Click the ‘+’ icon to add a new page, then choose Blog.
You can rename your Blog here if you wish, or just hit Enter to get to the next step (where you’re also given an option to rename).
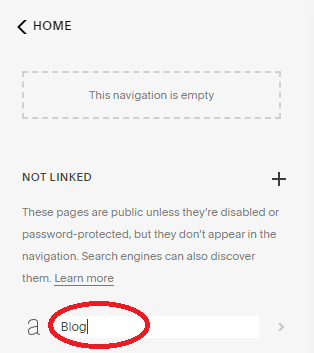
Rename your blog then hit Enter, or just hit Enter to move to the next step.
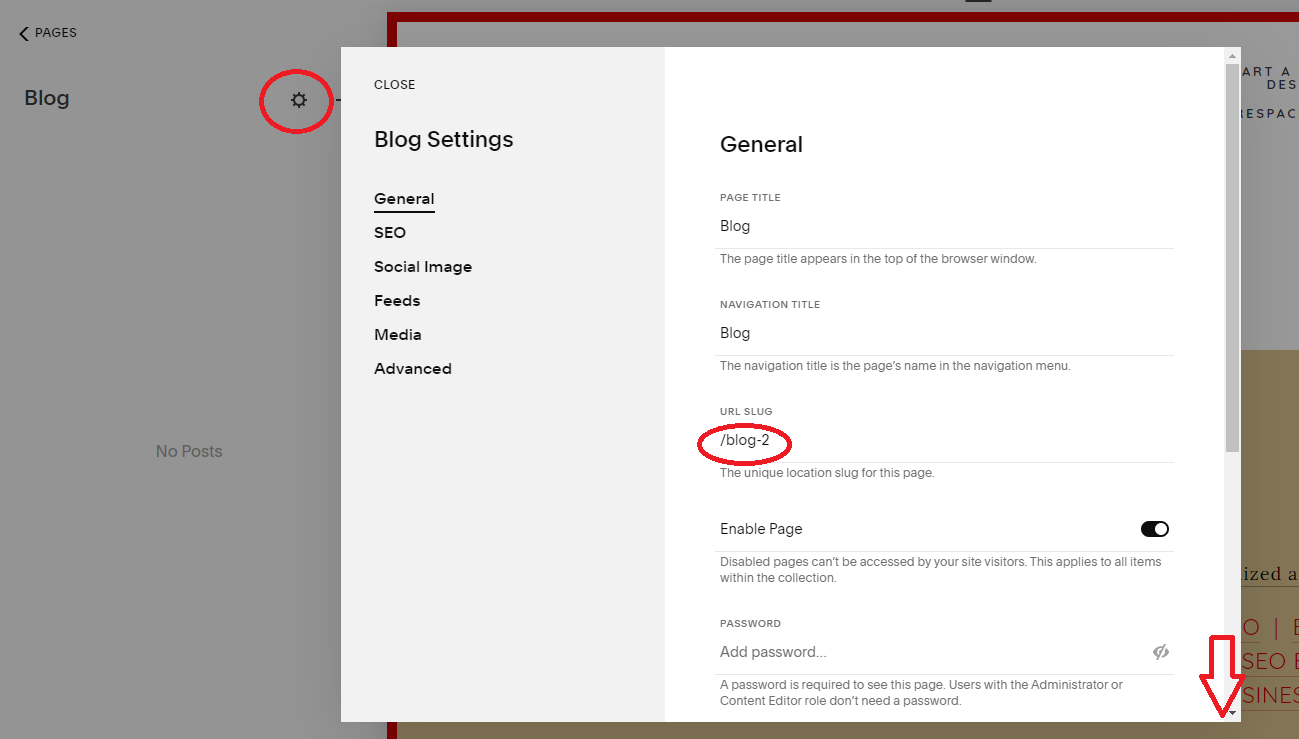
Now the Settings of this new Blog will open in a pop-up window. Here, you need to pay attention to the Page Title, Navigation Title, URL slug, and Page Description.
Page Title: This will not show on your actual site anywhere but could show in random places around the Internet. Best to align it with your Navigation Title.
Navigation Title: This is the page title that shows in your top header and bottom footer navigations on your website. So if you want it to say something like Journal or Articles instead of Blog, adjust that here.
URL Slug: This is very important for SEO. You need to choose an appropriate URL slug based on your keyword research. You can always just leave it short and sweet with /blog but I like to optimize websites at every possible chance for best performance. If you have no idea what your target keywords are for your site, I’d check it out this Squarespace SEO Expert course pronto or your blogging efforts will likely be in vain.
Page Description: Scroll down just a tad and you’ll see a big empty box for your Page Description. This should be a tasteful blend of what you blog about / who you are / what you do / laced with high-value target keywords. We’re going to paste this into your SEO Description in the next step, and this will show up in search engines, so make it good! If you’re clueless about SEO and keywords, again- you really should invest in the Squarespace SEO Expert course.

Next, we’re going to click on the SEO tab under Blog Settings in this same pop-up window and input our SEO Description. Simply copy your Page Description from the previous step and paste it here in the SEO Description. You can optimize your title if you wish by adding an extra high-value keyword or something like that. Reminder: this SEO title and description will show in search engines and if your Blog is shared on social media platforms.
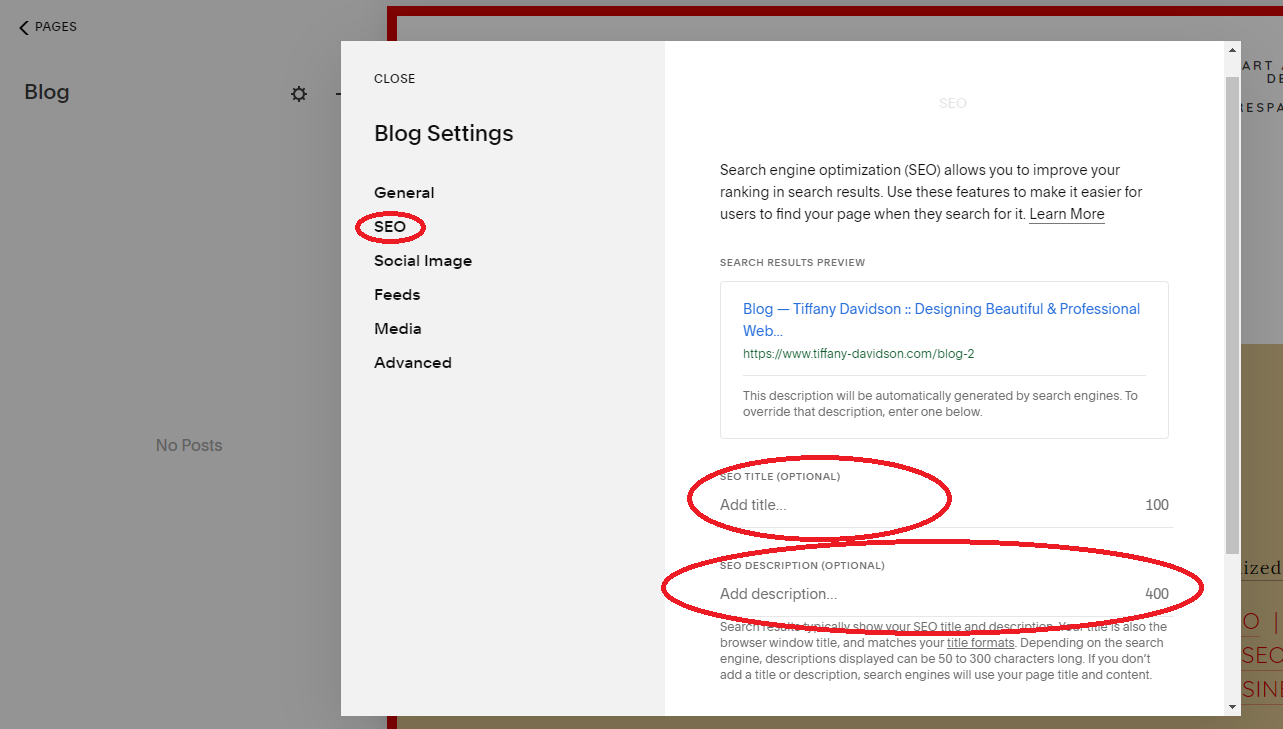
Once you’ve completed the above steps, be sure to click SAVE at the top left of the pop-up window.
Create a Blog Post Template
The reason for making a template to use for each new post is to create a uniform look between your articles.
But more than anything, its primary benefit is to prevent you from having to build out a sidebar every single time.
Some templates have sidebar functionality built-in, but the template I use—Pedro— doesn’t offer this, so instead I just design a sidebar into the blog post template. Sometimes I customize the sidebar depending on the specific blog post I’m working on because some sidebar items might not be relevant to that specific blog post topic.
So, in a nutshell— you should have a template in place to build each new blog post from, and that template should include your sidebar, but you can tinker with the sidebar for each new post if you wish.
Hopefully I didn’t just confuse you … >_>
Let’s Make a Template & sidebar For Your Blog
Walking through all of the steps in text could be confusing, so I made a little tutorial video for you:
How to Use the Template For Each New Blog Post:
Now that you have a template parked in your blog queue, you need to know how to use it.
Every time you’re ready to write a new blog post, simply go to that template, click EDIT, when the pop-up window appears, click DUPLICATE.
A new pop-up window will appear which is a copy of your template. This is what will become each new blog post!
With this Template Copy, you’re going to build out your new blog post. Right away, you want to update the following items:
In the Content tab:
Title
Tags/Categories
Switch Comments to On if that’s what you prefer
In the Options tab:
update URL slug
Upload new thumbnail image
Add Excerpt if your blog layout features excerpts
Here’s another tutorial video to make things a bit more clear:
What Should a Sidebar Contain?
Everyone will have their own thoughts as to what a blog sidebar should feature, so please bear in mind this is only my opinion.
First, it’s important to understand that if you blog correctly (that is, using SEO principles), a lot of visitors will arrive to your site for the first time ever via a specific blog post. Therefore, your sidebar is an opportunity to engage those first-time visitors who otherwise might only be interested in that one blog post. Your sidebar could intrigue them and encourage them to explore more of your site.
I think a sidebar should be used to feature these basics:
a photo of you or your team (in the Internet world, it’s important to bring the human element- portraits help achieve this, putting a face, or faces, to what would otherwise be an article like any other)
what you do / what your company does
how you/the company can help them
products you offer (simply by using the Product block)
how to get in touch
From here, you might decide to add more items to your sidebar such as links to pages on your site (Example: “Browse My Portfolio” or “Read Related Articles Here” or “See a List of Services Here” incorporated into graphics), ads (if you are monetizing your site), or a newsletter block so they can sign up.
I recommend browsing websites you love and paying attention to what they feature in their sidebars, then getting ideas and putting your own personal spin on things.
p.s. The first video up above shows how I design my sidebar
SEO Optimization of Blog Posts
I’m not going to go too much in-depth on this topic because I created a course all about it, but… if you aren’t blogging for SEO, your blog will probably not get noticed unless you:
have a HUGE (and devoted) social media following
have a big budget for ads
Good organic SEO is the currency for us folks who would love to show up on Google Page 1 for our target keywords, but don’t have all the social or monetary currency to put into it.
Let me be as direct as possible: If you plan to take your website/blog seriously, then you need to learn legitimate SEO. Conveniently, I packed everything (no really- everything) you need to know into a course here!
A Keyword For Each Blog Post
Every single blog post you write should have a specific keyword that it’s targeting.
With this keyword, you should:
Craft a title around it (you can get creative!)
Use it as your blog post URL slug (don’t get creative, be very straightforward- the shorter the URL the better)
Add it as a tag to the blog post
Page titles and URLs are big in the SEO world, so be sure to optimize those with your target keyword before publishing (and be sure you have an understanding of what an effective keyword is to begin with).
Add A Thumbnail
Each blog post should be represented by an image specific to it. Not only does this play into your Blog Page design, but this thumbnail will also show when your post is shared on social media. Furthermore, you can rename this thumbnail image before uploading it, making sure the filename is your target keyword for the specific post. SEO tips everywhere in this post, I tell ya!
You can even create thumbnails using free software such as Canva, where you can add text and elements over photos, use pre-existing templates they offer, or create your own blog post thumbnail design for brand congruence.
(In the video above, I show you how to upload a thumbnail to each blog post.)

Another random mostly unrelated photo for Twin Peaks fans- here I am inside “The Great Northern” just waiting, like Leland, for somebody to dance with me!
Categorizing Blog Posts
The main purpose of categorizing blogs is to be able to organize content throughout your site.
Assigning a category (or categories as blog posts can have multiple categories assigned to them) allows you to do things like:
Add links in your header navigation to specific categories of interest
Add a related articles section to blog posts
I showed you in the tutorial video above how to assign categories to a blog post. Keep in mind the following formatting tips:
categories must be 25 characters or less
categories are case-sensitive, so Fern fern and FERNS creates three different categories
don’t use special characters like !@#$%^&*()
Example: An example of using categories for a blog is this review site: Rugged Man. Here, I assigned categories to each blog post and then designed separate pages for each category to feed into using a summary block. The links you see in the header navigation — HUNT, PREPARE, EXPLORE, and so on— are blog categories. Each time the website owner publishes a new article, he assigns the applicable categories and it automatically updates on the corresponding page(s). You can also skip building a specific page and just add a Link in your header navigation that links to any blog Category.
Designing a Blog Page
A very important step is to decide how you want to present all of those blog posts you work so hard on!
As with most things design-related, there are many different approaches depending on your functional and aesthetic goals and preferences.
The simplest way is to use the built-in Blog as your blog display page, rather than creating a separate page/index page and feeding posts in via a summary block.
Summary blocks only allow for 30 items, so you would need to figure out a system so that visitors could easily browse all of your blog posts, not just the latest 30.
For this reason, I recommend using the built-in Blog page. If you hover at the top of the Blog Page (in the Pedro template, at least) you can edit the INTRO section to include a nice big photos, some text, or any other blocks you want to include above all of the blog posts. This allows for some customization rather than just a page of blog posts and nothing else.
In case that’s confusing, I made a quick tutorial video showing you what I mean (even though I have sniffles today and sound like Tweety Bird)—
Rearranging blog posts
You can easily rearrange blog posts by going in to edit the post, then changing the Published date. So if you published a post last year, but you just updated it and would like it to come to the front of your newest blog posts, just change the date to a more recent date than any of your other blog post publish dates.
For example, today is January 28, 2021 and if I had a blog post from last summer I wanted to refresh and show most recently, I would just:
Locate the blog post
Click Edit to get the pop-up screen editing window
At the bottom right of this pop-up window where it says Published with a date below it… click that date, then adjust it to January 28, 2021 to ensure it shows as most recent
Easy enough!
Set a Blogging Schedule
I recommend publishing one new post a week, but more importantly than anything you should get on a regular schedule that’s realistic for you. If this means one new post every two weeks, so be it- just be sure you stick to it.
You should add blogging to your to-do list just as you would any other important work task. This is the only way you’ll really grow your blog over time.
It takes consistent and persistent effort to see the fruits of blogging, be it increased clientele or increased passive income from your monetization methods.
SEO Blogging
But blogging alone is not enough, you need to understand what to blog about. This requires a true understanding of Squarespace SEO and knowing how to find the right keywords that your target audience is searching for, then how to target those keywords so you eventually rank on Google Page 1 for them.
All of this, and more, is covered in-depth in my Squarespace SEO Expert Course.
And one last shot for Twin Peaks fans— taken at Kiana Lodge where most of the interior scenes of the Great Northern were filmed :)
If done correctly, blogging is one of the very best investments you can make in your website and business overall.
Hopefully this article has helped you understand more aspects of blogging and setting up your own blog, as well as some further things to consider about the why and how of your blog posts.
Let me know in the comments if you have any questions for me. I’m happy to help!
Thanks for stopping by and I’ll talk to you again soon~
x
Tiffany


Welcome!

Hey there! I’m Tiffany ~ a Squarespace Web Designer & SEO Expert. I design beautiful & professional websites that rank well on Google, & I teach courses on becoming a Squarespace SEO Expert and Starting Your Own Squarespace Design Business!
Feel free to contact me at: tiffany@tiffany-davidson.com
Sign up for a free Squarespace trial here! #afflink
MY COURSES

Learn how to get your Squarespace website (or any Squarespace website) to Google Page 1 using organic SEO techniques!
As a Squarespace Designer & SEO Expert, I know the methodology for truly getting Squarespace websites to rank on Google Page 1, and I’m going to teach it to you!
This course is a self-guided lifetime-access course, so you can go at your own preferred pace and keep it as a resource to return to time and time again.
Please note: This course was created using Squarespace version 7.0. The same principles will still apply with version 7.1, but the overall user interface will look slightly different. Due to the inherent nature of digital products, refunds are strictly prohibited once purchase has been made. Please also note the course cost is $267 in USD currency.
Learn how to turn your basic design knowledge into a functional and successful business!
In this course, I outline the procedures I use to run my Squarespace design business which continues to grow in revenue every single year and has given me wonderful freedom to not only work from home, but to be able to craft my own schedule. Becoming a Squarespace designer changed my life, and I think during these new times we find ourselves in, where so many businesses are having to transition to the online marketplace in order to stay afloat, becoming a self-employed web designer is a really smart move.
Please note:
This is not a design course. Rather, this course assumes you already possess at least a basic understanding of Squarespace design and need guidance on converting that knowledge into a business.
Due to the inherent nature of digital products, refunds are strictly prohibited once purchase has been made.
The course cost is in USD currency
