
Squarespace CSS: Change Image on Hover (& Add a Click-Through Link if Desired)
Sign up for a free Squarespace trial here! #afflink

This is one of my favorite pieces of CSS.
I was first exposed to it from this very helpful video, but when I also needed the images to be clickable upon hover, I thought: “I bet other people out there need the very same effect and functionality and aren’t sure how to make that happen.”
So this is going to be the full tutorial on how to achieve both, simultaneously if you wish, for a nice interactive feature on your Squarespace site.
Once you’ve learned how to implement this effect— and it’s easy, so don’t worry—you can really get creative with its uses.
So without further ado, let’s hop in!
Squarespace CSS trick:
Change image on mouse rollover
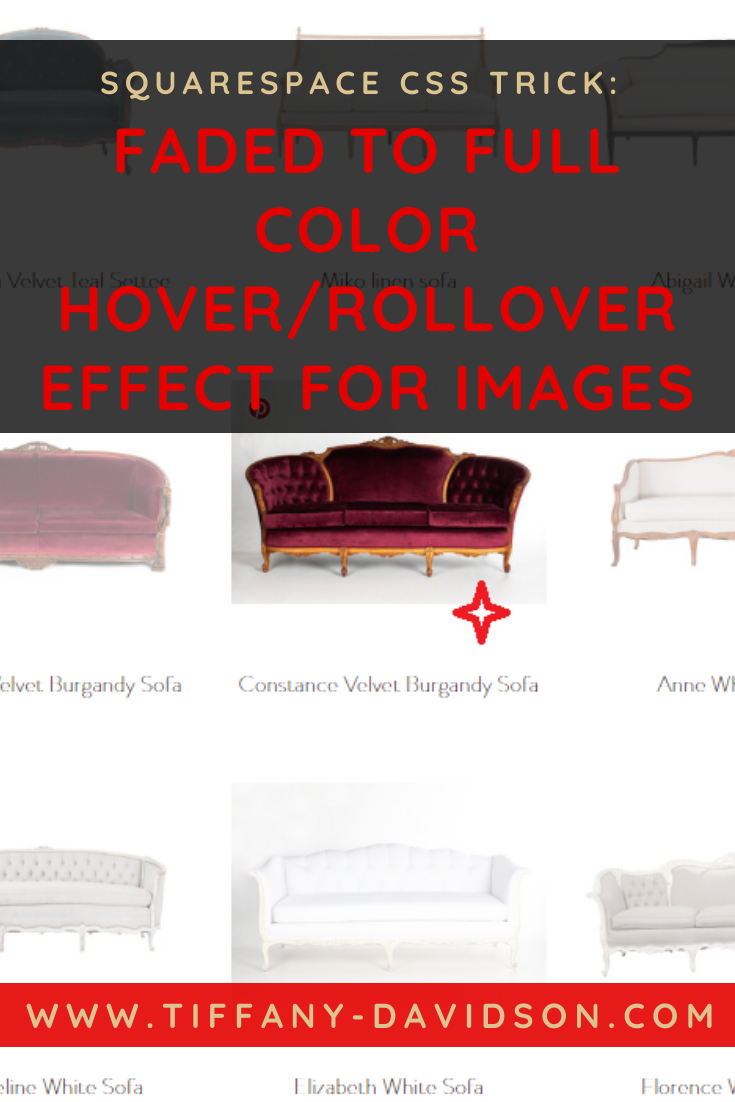
Here is an example of what I mean by changing images upon mouse rollover:
Accomplishing this requires three simple and straightforward steps:
Upload both images to Custom CSS files
Copy the link generated for each image
Paste code into a Code block and insert links to both images
That’s all!
Step 1 - Upload both images to Custom CSS files
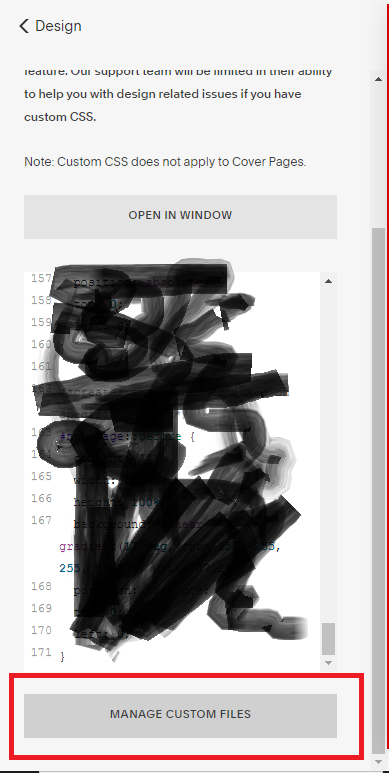
From your left dashboard menu, click Website > Pages > Website Tools > Custom CSS then scroll down and click ‘Manage Custom Files.”
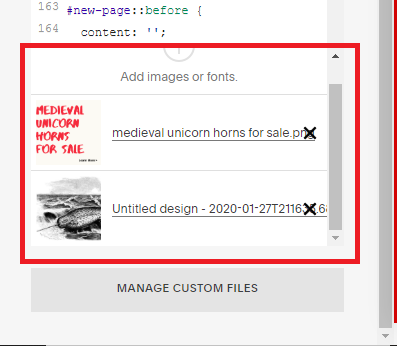
Upload the two images you want the effect to switch between.
Step 2 - Get the URL for each image
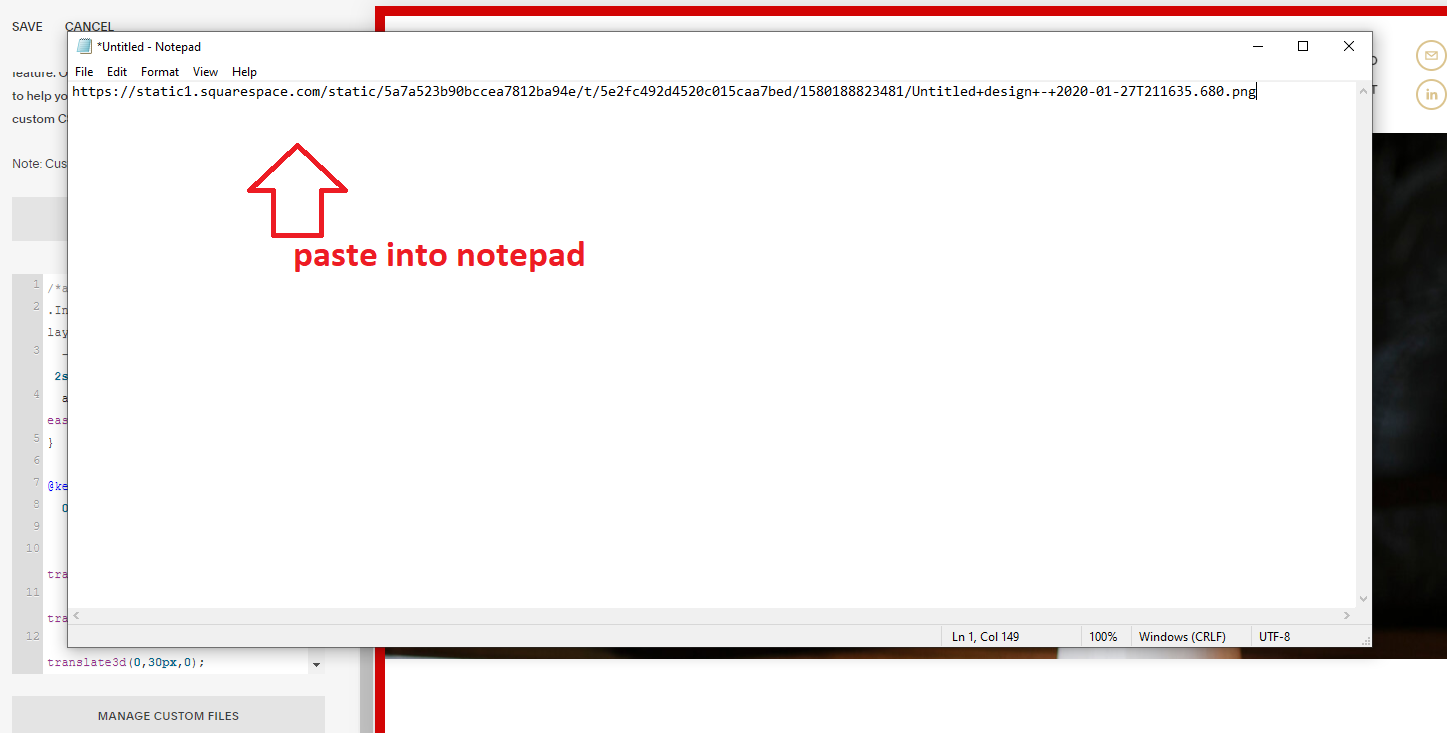
In this same ‘Manage Custom Files’ window, click on the filename of each image, one at a time. A link will automatically populate at the top of your Custom CSS window (you’ll probably have to scroll up a bit to find it). You want to highlight and cut that link (this way it’s removed from your Custom CSS and simultaneously copied to your clipboard).
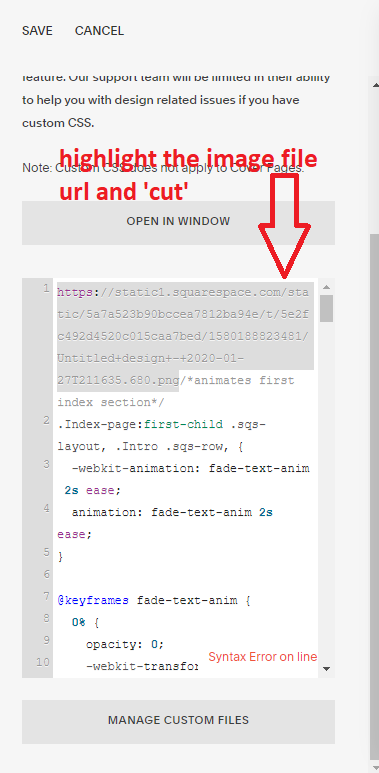
Now paste that URL into a Notepad (or a blank email, or wherever you want to paste it for safe keeping).
Repeat this exact process for the second image, generating the URL by clicking the file in ‘Manage Custom Files,’ then highlighting the URL, cutting, and pasting to your Notepad.
You should now have two separate links in your Notepad: one for the first image, and one for the second.
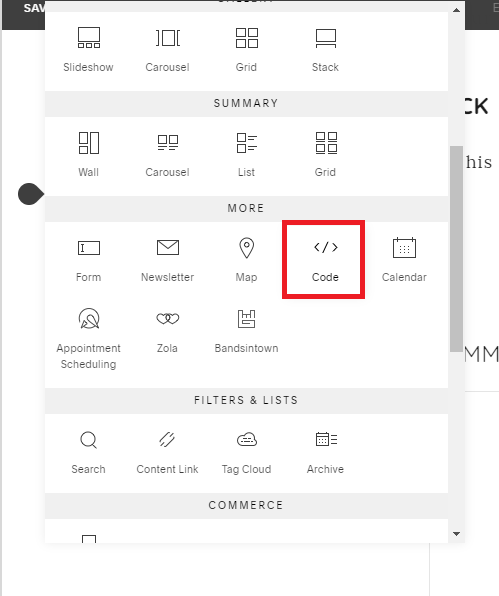
Step 3 - Setting up the code block
Navigate over to where you want to display this effect on your website, and add a Code block.
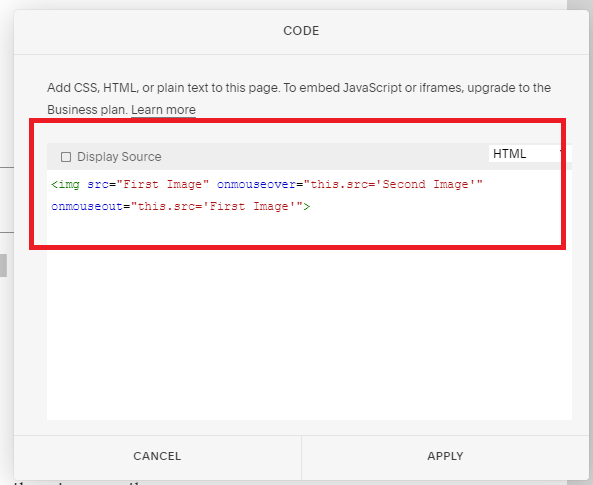
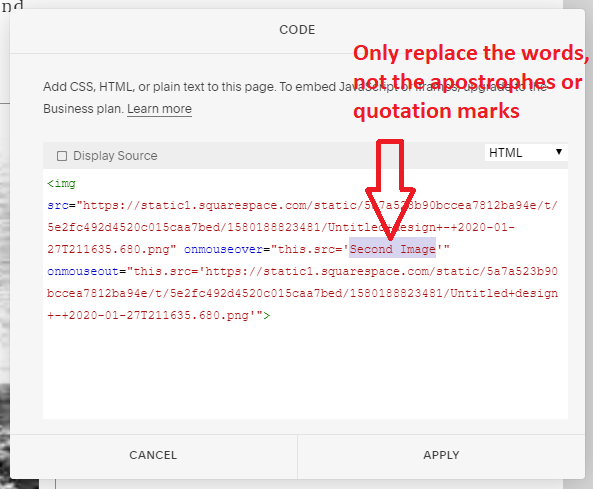
Remove <p>Hello, World!</p> from the box and paste the following code:
<img src="First Image" onmouseover="this.src='Second Image'" onmouseout="this.src='First Image'">
Now navigate over to your Notepad, or wherever you pasted the URLs for both of your images, and copy the URL for the first image. This is the image you want to appear prior to any interaction with the mouse, and the same image that will reappear after the hover action has taken place and the mouse has moved elsewhere.
In the Code block, replace the two occurrences of First Image with this link. Be sure not to remove any other characters or your code won’t work.
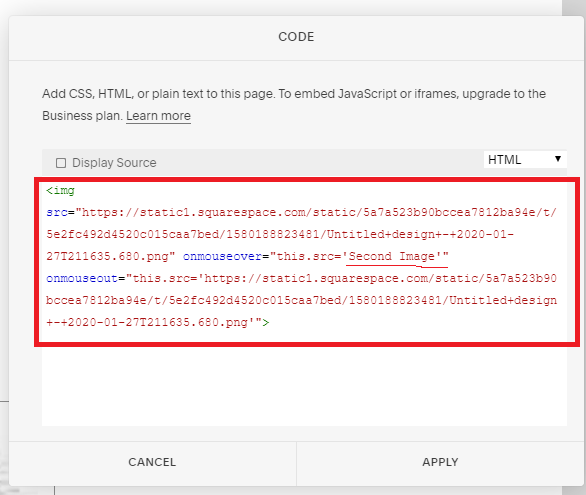
Now you want to repeat the same process, but this time copy the URL for your second image and replace the words Second Image with this image file URL. Your second image is the image you want to show when the mouse rolls over the initial image.
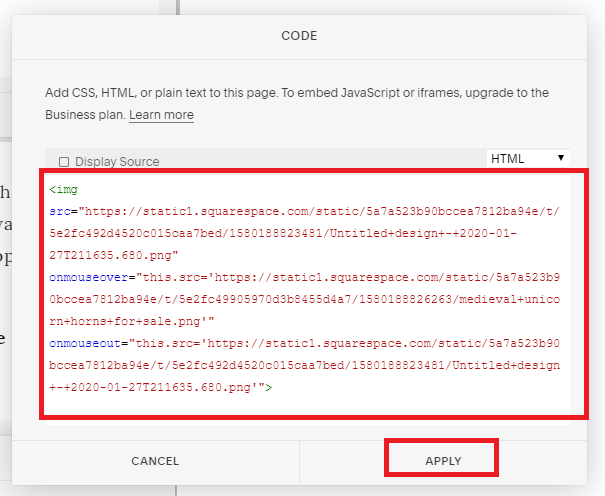
Click Apply to save everything, then Save the page you’ve been editing. If the effect doesn’t work right away, refresh the page and try again. If it still doesn’t work, go back and check your work and make sure you didn’t delete a character or leave something out. It’s also a good idea to go to your website in a separate browser as a public viewer instead of within your Squarespace account to check if it’s working or not. If you’re still having difficulties, I recommend watching this YouTube video to see the aforementioned steps being performed in real-time.
want to make the images clickable?
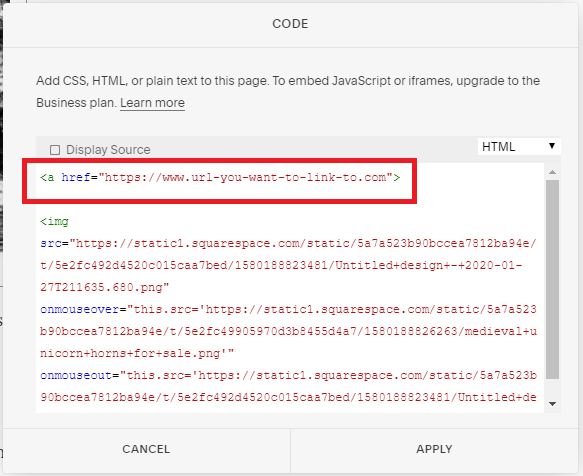
This is even more simple— if you want to add a link for the images to click-through to, open your Code block again and add the following code to the top/beginning of the code we just finished, adding the unique URL you want the image(s) to link to:
<a href="https://www.page-you-want-to-link-to.com">
Then at the bottom/end of the code we added in the first steps, add:
</a>
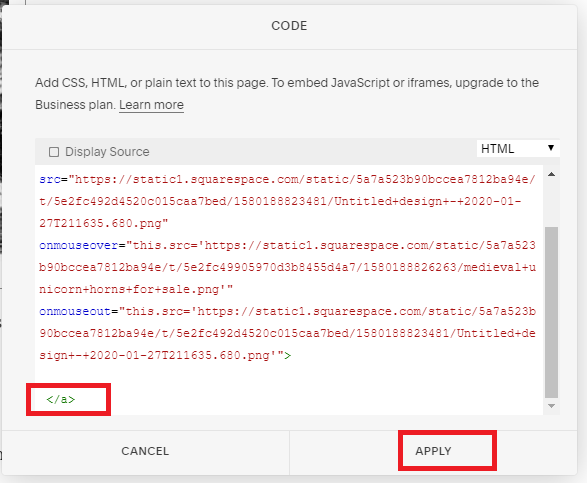
Click Apply to and be sure to Save your work.

Voila! That’s all! Hopefully everything worked for you.
I love this effect. It can be used on professional sites for a more dynamic presentation of content and of course you can have a lot of fun with it, too.
Hopefully you found this helpful! Let me know if you have any questions.
Thanks for stopping by!
x
Tiffany


welcome!

Hey there! I’m Tiffany ~ a Squarespace Web Designer & SEO Expert. I design beautiful & professional websites that rank well on Google, & I teach courses on becoming a Squarespace SEO Expert, Monetizing Squarespace, and Starting Your Own Squarespace Design Business!
Feel free to contact me at: tiffany@tiffany-davidson.com
Sign up for a free Squarespace trial here!
my top-ranked squarespace seo course:
Learn how to get your Squarespace website (or any Squarespace website) to Google Page 1 using organic SEO techniques!
As a Squarespace Designer & SEO Expert, I know the methodology for truly getting Squarespace websites to rank on Google Page 1, and I’m going to teach it to you!
This course is a self-guided lifetime-access course, so you can go at your own preferred pace and keep it as a resource to return to time and time again.
Please note: This course was created using Squarespace version 7.0. The same principles will still apply with version 7.1, but the overall user interface will look slightly different. Due to the inherent nature of digital products, refunds are strictly prohibited once purchase has been made. Please also note the course cost is $267 in USD currency.
More Squarespace Courses:
Can you monetize a Squarespace website? Yes, you can. And I’ll teach you how.
Did you know your Squarespace website could be making money for you, even while you sleep, work your day job, or travel?
In this course, which includes over 3 hours of video instruction, I’ll teach you how to use SEO blogging to drive traffic to your site, and then how to monetize those visits.
Please note: This course was created using Squarespace version 7.0. The same principles will still apply with version 7.1, but the overall user interface will look slightly different. Due to the inherent nature of digital products, refunds are strictly prohibited once purchase has been made. Please also note the course cost is in USD currency.
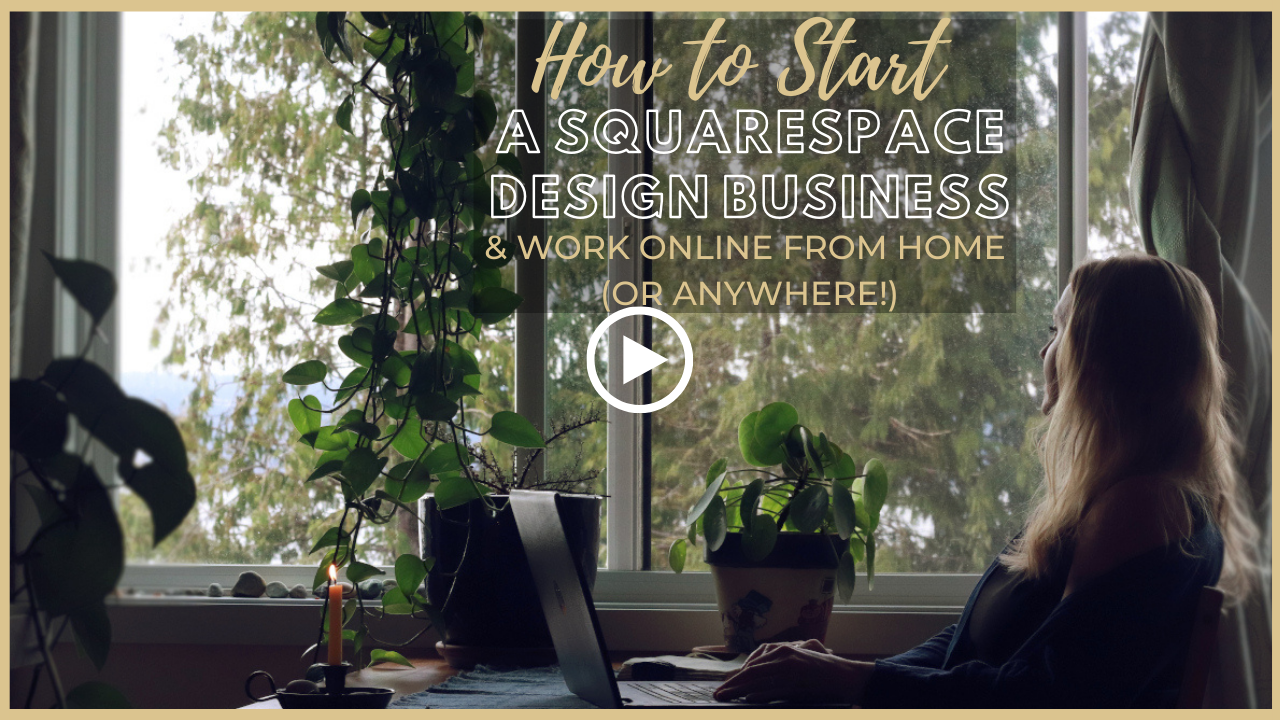
Learn how to turn your basic design knowledge into a functional and successful business!
In this course, I outline the procedures I use to run my Squarespace design business which continues to grow in revenue every single year and has given me wonderful freedom to not only work from home, but to be able to craft my own schedule. Becoming a Squarespace designer changed my life, and I think during these new times we find ourselves in, where so many businesses are having to transition to the online marketplace in order to stay afloat, becoming a self-employed web designer is a really smart move.
Please note:
This is not a design course. Rather, this course assumes you already possess at least a basic understanding of Squarespace design and need guidance on converting that knowledge into a business.
Due to the inherent nature of digital products, refunds are strictly prohibited once purchase has been made.
The course cost is in USD currency