
5.1 Using Google Search Console

Photo by Tiffany Davidson; Taken in Sedona, Arizona
Congratulations! If you’ve made it this far that means you’ve learned the most important actions to implement to optimize a Squarespace website.
Now, we just need to wrap things up by discussing a few ongoing maintenance actions: using Google Search Console, consistent blogging, and adding new content.
We’re almost finished, and the hardest part is behind you! Let’s jump in and wrap things up, starting with how to use Google Search Console.
Google Search Console is a wonderful tool that we should learn to communicate with anytime an update to our site is made.
Google Search Console is a tool you can use to get really valuable insights into your site’s performance, but I especially love using it to keep Google informed of the latest changes to my websites, so they can reindex accordingly without any delay.
I use Search Console for two primary reasons:
to submit sitemaps
to inspect URLs for indexing (anytime I update an existing page, create a new page, or publish a new blog post)
But before you can submit sitemaps or inspect URLs, your site needs to be connected and verified with Google Search Console.
This process can sometimes be a bit tedious as there are a couple of different if-then scenarios that can play out.
Once you have your site connected and verified though, it’s simple to go in and inspect URLs. The most common time you’ll be doing this is when you publish a new blog post, and it will take about 30 seconds to submit your new URL. So not a big deal at all, but unfortunately the connecting and verifying process can sometimes be wonky.
Sidenote: I do not connect my clients Search Console for them. If you’re a designer who plans to use this course to start offering Squarespace SEO services, I recommend doing the same, as you would have to get their Google login info and then login to Google as them. This is too much of a headache, and I don’t want anyone’s Google information, so I have created a guide showing my clients how to connect and verify their site on their own. I’m going to share that with you now!
How to connect & verify your squarespace website with google search console
Note: Before trying to connect Search Console, you need to make sure your Squarespace subscription is activated, your domain connected, and your site public.
ATTEMPT #1
First, let’s try this route, which is definitely the easiest and has worked for me recently on a site:
Sign up for Google Search Console if you haven’t already. You’ll need a gmail/gsuites email address.
Login to the backend of your Squarespace site. From the left dashboard menu, click Settings > Third Party Tools > Connected Accounts > Connect Account> choose Search Console > then follow the instructions.
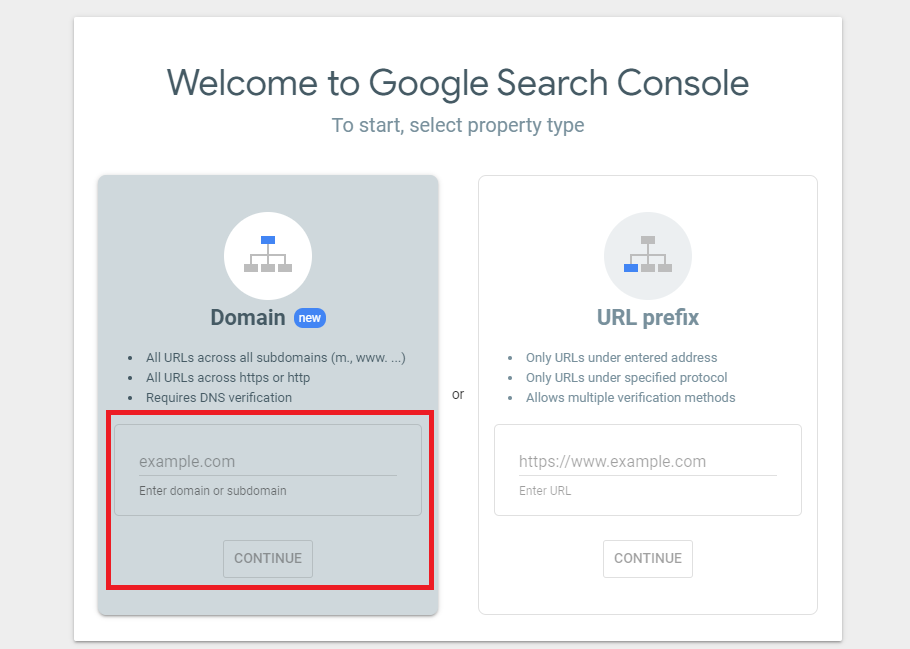
Now head over to Search Console to add a property. A pop-up window will appear with two options: Domain or URL Prefix. Choose URL Prefix and paste your domain name in the box making sure to include the full URL (https:// and all).
Click continue, and it might just connect and verify your site right then and there. No further verification needed.
BUT IT MIGHT NOT :/
If this doesn’t work, attempt the next option.
ATTEMPT #2:
1. Head over to Google Search Console again, and Add Property.
2. This time, instead of choosing URL Prefix, we’re going to choose Domain.
3. Enter your domain name simply in .com format, no https or www needed.
4. Click Continue and you’ll be given a verification code. Copy that entire code. Login to the backend of your Squarespace site, go to Website > Pages > Website Tools > Code Injection > then paste that code into the Header.
5. Then, go to Settings > Domains & Email > Domains > click on your connected domain > Edit DNS > now we’re going to add the code as a TXT record. At the bottom of the table of Custom Records, you’ll see an ADD RECORD button.
For HOST, you’ll enter @
For Type, you’ll choose TXT
Leave the PRIORITY field blank
Paste your verification code into the next DATA field
Then click SAVE

6. Then head back over to Search Console and check for verification. You might have to wait a day or two.
SUBMIT YOUR SITEMAP-
Now that you’ve (hopefully) connected and verified your Squarespace site with Search Console, you’ll want to first submit a sitemap.
To do this, simply go to the main dashboard of Search Console, which should look like this:
…and click Sitemaps. A box will be provided to you with your domain already placed, and you’ll simply need to type sitemap.xml into the box after the domain. Like so:

Click Submit. Ta-da! You’ve submitted your sitemap to Google. Good job!
SUBMIT URLS FOR INSPECTION AND INDEXING
Now you want to check all URLs around your site to make sure they’re showing up in Google. For example, if you have a 5-page website with a Home page, About page, Services page, Portfolio page, and Contact page, then you would want to submit each unique URL separately for inspection and indexing.
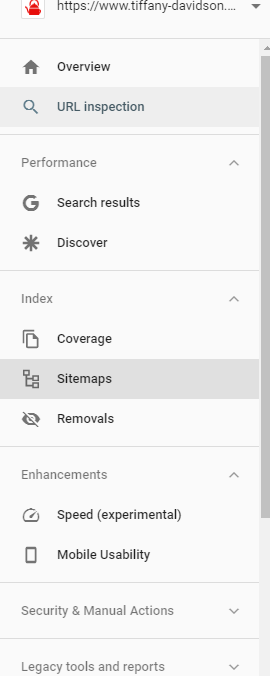
To do this, click URL Inspection in the left dashboard menu on Search Console. Enter the URL you want to get indexed in the top search bar, hit enter.
Then, Request Indexing.
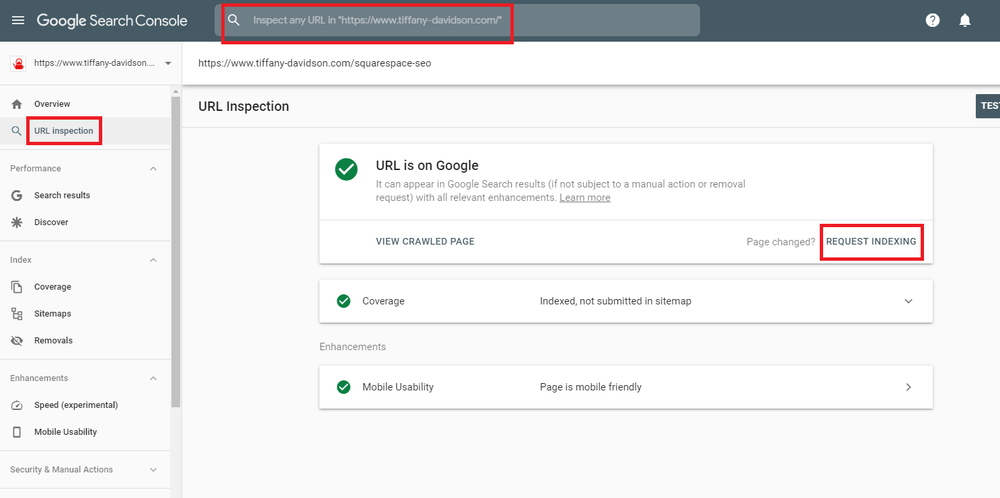
Anytime you make changes to a page on your site, add a new page altogether, or publish a new blog post, be sure to inspect the URL and request indexing in Google Search Console. This helps Google catch on to your changes and index them more quickly.
Every single time you publish a new blog post, go over to Search Console right away and submit the new URL, then Request Indexing.
Always. Don’t forget this step. It’s part of SEO blogging.

Welcome to Squarespace SEO Expert! In this course I'm going to teach you the exact process I use to rank Squarespace websites on Google Page 1, using no paid advertising, only organic SEO techniques. If at any point you have questions, please use the comment feature at the bottom of the particular lesson you have a question about. I'm happy to help!

-
1. Introduction
- Mar 2, 2020 1.1 Welcome!
- Feb 3, 2020 1.2 What Is SEO? Why Is It Important?
-
2. Anwering Questions
- Jan 3, 2020 2.1 Necessary Initial Questions
-
3. Keyword Research
- Dec 3, 2019 3.1 Discover What Your Target Audience Is Searching For
- Nov 3, 2019 3.2 Using Suggested Keywords
- Oct 3, 2019 3.3 Keyword Planner Tool
- Sep 3, 2019 3.4 High-Intent Keywords
- Aug 3, 2019 3.5 Generating Blog Post Topics
- Jul 3, 2019 3.6 Site Meta Title & Description
-
4. Applying On-Site SEO
- Jun 3, 2019 4.1 SEO Title and Description Fields
- May 3, 2019 4.2 Optimizing Image Files Before & After Uploading
- Apr 3, 2019 4.3 On-Page SEO
- Mar 3, 2019 4.4 Understanding The Sitemap
- Feb 3, 2019 4.5 Blogging For SEO
-
5. Moving Forward
- Jan 3, 2019 5.1 Using Google Search Console
- Dec 3, 2018 5.2 Consistent SEO Blogging
- Nov 3, 2018 5.3 Adding New Content
- Oct 3, 2018 5.4 Epilogue
Copyright
© 2020-2024, All Rights Reserved
All content in this course is created and owned by me and cannot be used or sold elsewhere. Thank you for appreciating and valuing my work and experience.