
4.3 On-Page SEO

Photo by Tiffany Davidson; Taken in Sedona, Arizona
For good SEO, we need to target a specific keyword on each page of our site.
Now that we’ve optimized site-wide SEO fields and learned how to optimize images, both before and after uploading, it’s time to learn additional techniques to be used on each individual page of your site.
Our primary focus here is in the “back end” of each page or- the page Settings.
So let’s begin there.
Adding “Backend” SEO to Page Settings:
For all pages of your site including blog posts, portfolio items, and products you will need to perform three primary optimizations in the backend page settings:
URL*
SEO title and description (shown in previous lesson)
Page title
To get into the page settings of each page, simply hover over that page in your left dashboard menu, then click on the gear icon.
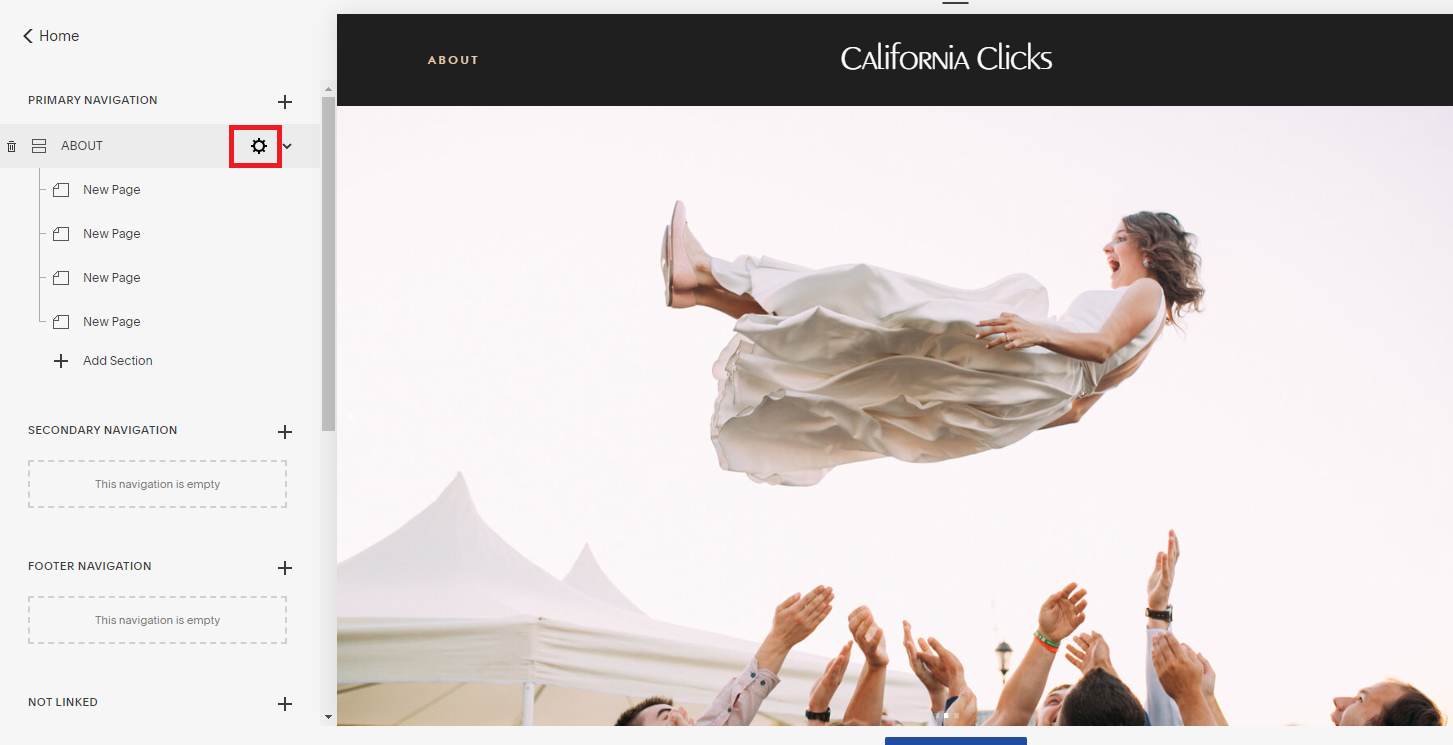
A pop-up window will appear where you can access all of your page settings. Now we can optimize the three primary fields:
1.) Optimize Page URL Slug
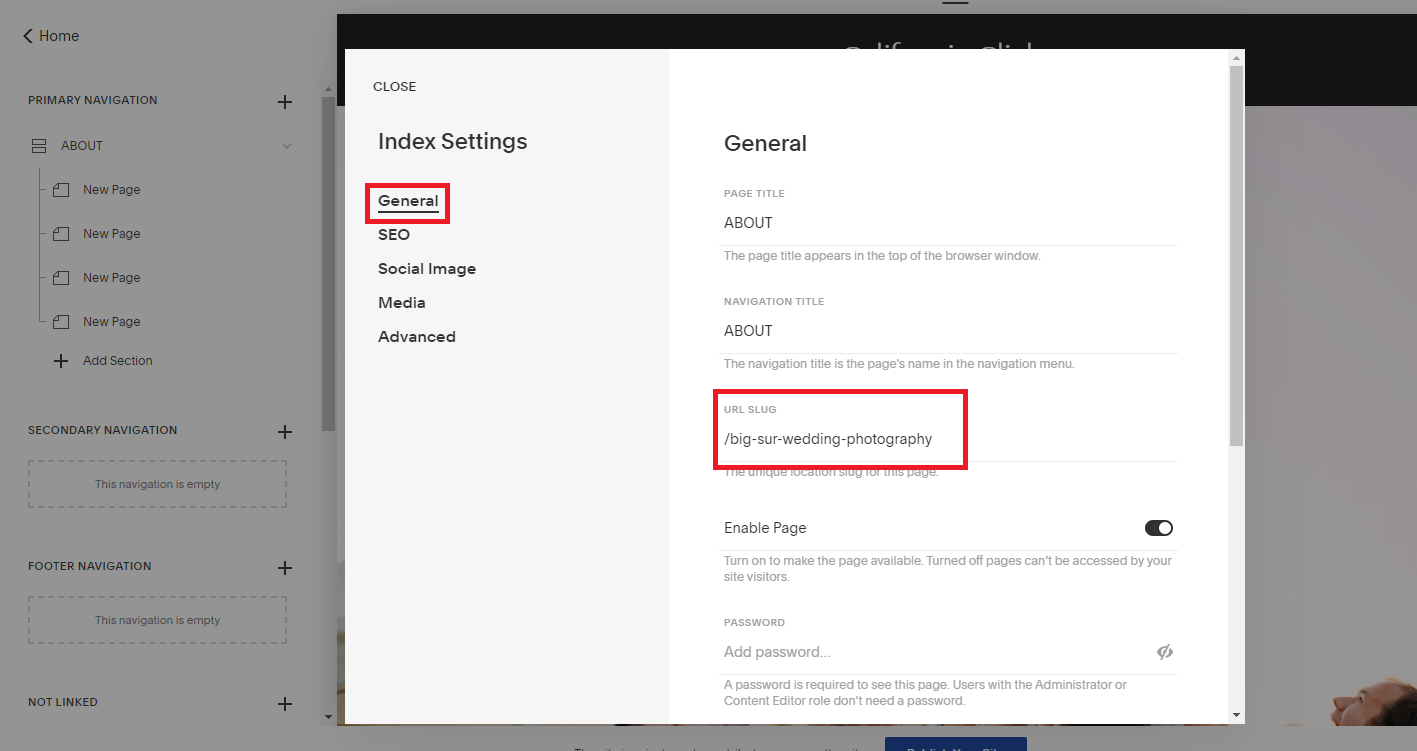
Rather than using simple straightforward URL slugs such as /about or /services, I replace all page URLs with a keyword.
Search engine indexing and ranking really values titles and URLs, so you will notice I take every opportunity to inject the keyword into these fields.
WHICH KEYWORDS TO USE?
Here are two guidelines when selecting which keyword to use for a specific page:
USE A KEYWORD THAT IS IMPORTANT: I typically use my most important keywords, and use a variety (meaning a keyword for each different audience if I offer a variety of different services or am targeting various locations) rather than using similar keywords. For example: if I used /monterey-wedding-photographer as a page URL, I wouldn’t use /wedding-photography-monterey-ca on another page (this would cause the two pages to compete against one another and hinder your rankings). Instead, I would vary the keywords to reach all important audiences.
USE A KEYWORD THAT IS APPLICABLE THAT PAGE: the page will need to be a good response to that keyword when searched on Google. So if you choose a keyword from your list for a Contact page that only has a contact form on it, this page will not rank well in Google because the page content is not a good response to that keyword. You can change this by fully optimizing the Contact page and really building it out with FAQs, testimonials, services sections, and so on then it can target a specific keyword. Otherwise, I now recommend just leaving your contact page as /contact and not focusing it on a keyword.
So if I have five total pages on my website, I might use the following page URL slugs in order to cover a wide variety of my target audiences:
/monterey-wedding-photographer
/big-sur-wedding-photographer
/wedding-photographer-carmel-ca
/california-redwoods-wedding-photographer
/central-coast-california-wedding-photographers
Make sense? (I explain more in the video below.)
Okay. Once you’ve optimized your URL slug, it’s time to add a page description.
*If you’re updating page URLs for already existing (live) websites, you will need to setup 301 redirects for each page that you update.
Optimize Page Description*
Scroll down a bit from the URL slug field, and you’ll see a larger text field for Page Description.
*Note: Squarespace version 7.1 no longer offers this page description field, but if your site was designed using version 7.0 you will still have access to this field for optimization.
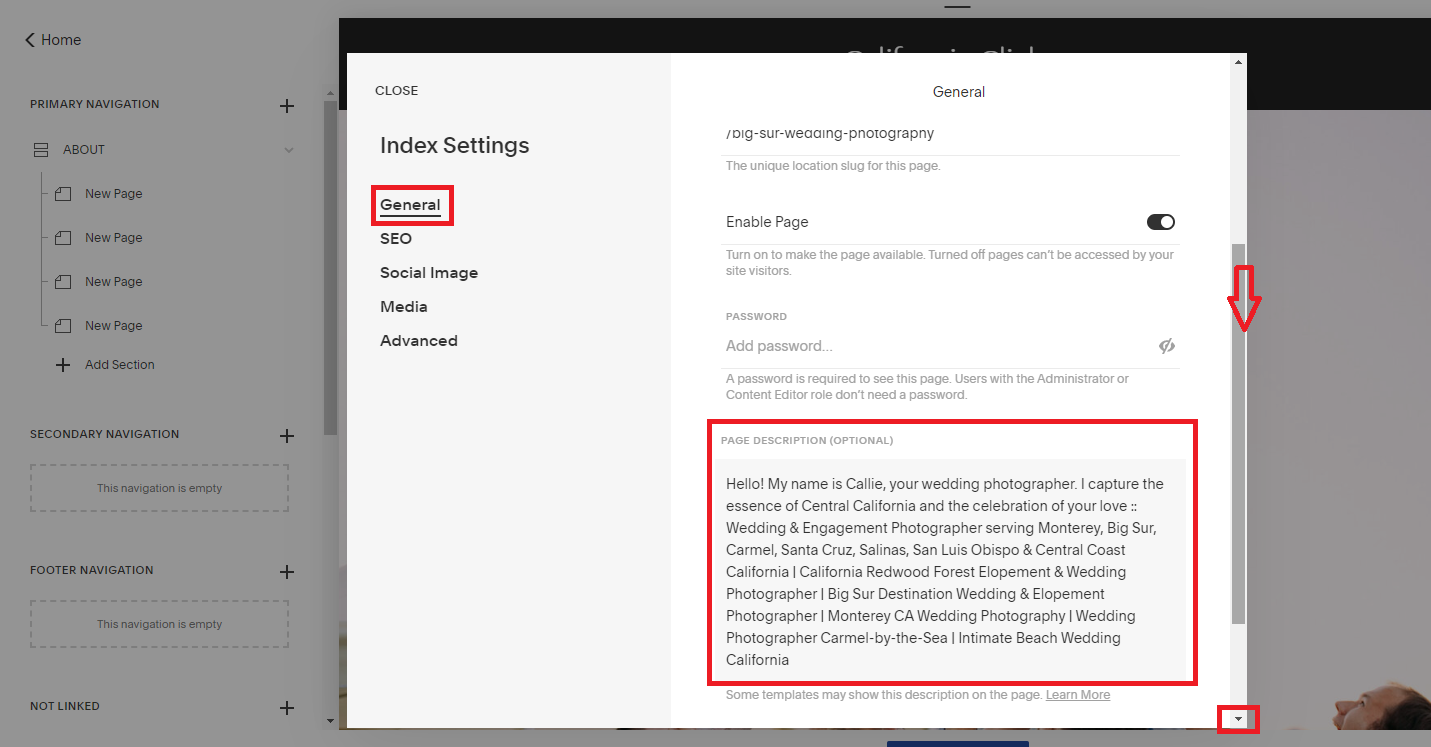
The description that we add to this field will also be used as the SEO description for the page (shown below).
This means that the first line or two will show on search engines when our site is shown as a search result.
For this reason, I make sure to make my first line human-friendly, then paste the site meta title description behind that. This way we are communicating to humans and robots optimally.
I’ll make the first line or two something that relates to that specific page, for example- in the above screenshot, we’re working on the ABOUT page and you’ll see my first line says: “Hello!” My name is Callie, your wedding photographer. I capture the essence of Central California and the celebration of your love ::” then I go on to paste my site meta title description.
Search engines will only show a small excerpt of this, and will cut off after a certain amount of characters. Your site meta title description won’t show, but will still be there for search engine robots to index and rank.
Make sense?
I’ll go into more detail about this in the upcoming video.
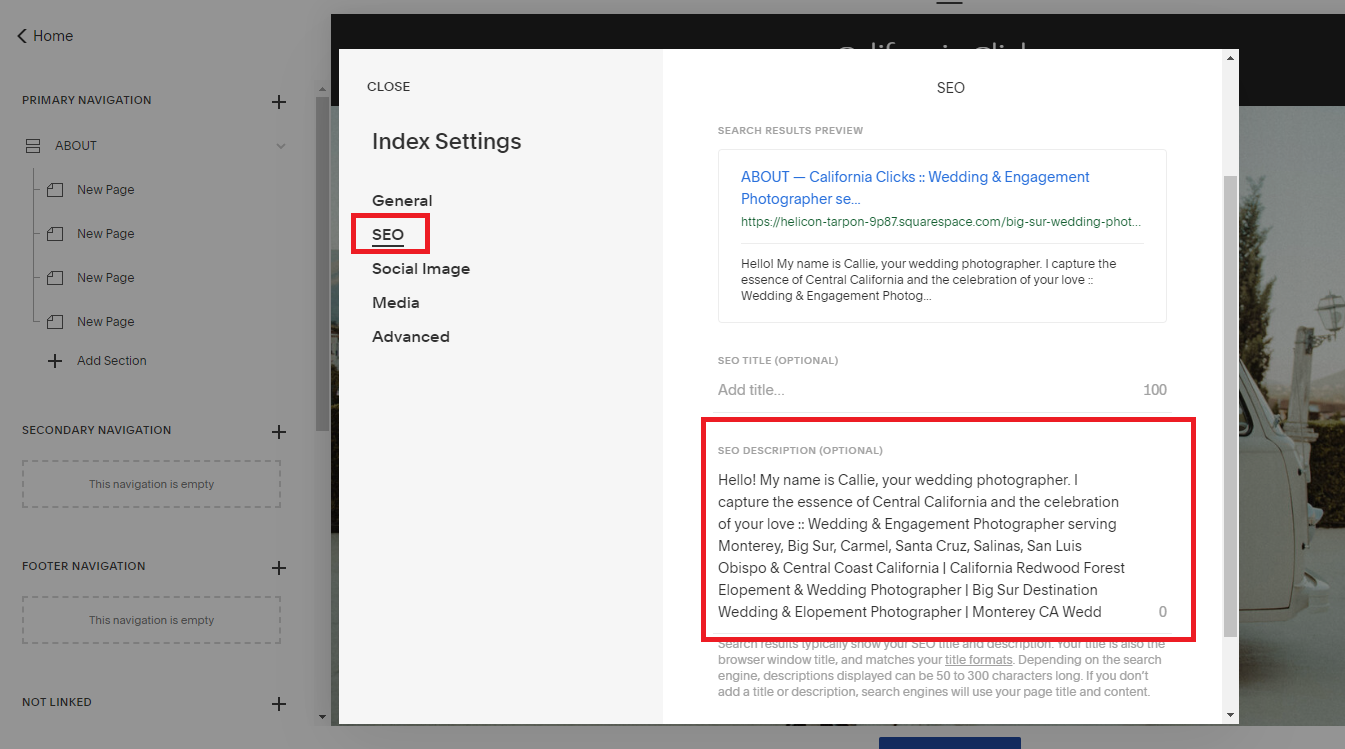
2.) Optimize SEO Description
The third and final backend optimization we want to do in Page Settings is to add our SEO description.
First, highlight all of the Page Description you just created and copy it.
In the left dashboard menu of the pop-up window you’re working in, click the SEO tab.
Then simply paste your Page Description into the SEO description field.
That’s it!
Those are the three ways I optimize backend Page Settings.
Be sure to save your work, and do this for every single page of your site.
Other On-Page SEO techniques
While image file optimization and these backend Page Settings are certainly the most crucial on-site SEO techniques, there are other tactics to keep in mind too.
This video will elaborate on everything you just learned as well as other on-page SEO techniques you can implement.

Welcome to Squarespace SEO Expert! In this course I'm going to teach you the exact process I use to rank Squarespace websites on Google Page 1, using no paid advertising, only organic SEO techniques. If at any point you have questions, please use the comment feature at the bottom of the particular lesson you have a question about. I'm happy to help!

-
1. Introduction
- Mar 2, 2020 1.1 Welcome!
- Feb 3, 2020 1.2 What Is SEO? Why Is It Important?
-
2. Anwering Questions
- Jan 3, 2020 2.1 Necessary Initial Questions
-
3. Keyword Research
- Dec 3, 2019 3.1 Discover What Your Target Audience Is Searching For
- Nov 3, 2019 3.2 Using Suggested Keywords
- Oct 3, 2019 3.3 Keyword Planner Tool
- Sep 3, 2019 3.4 High-Intent Keywords
- Aug 3, 2019 3.5 Generating Blog Post Topics
- Jul 3, 2019 3.6 Site Meta Title & Description
-
4. Applying On-Site SEO
- Jun 3, 2019 4.1 SEO Title and Description Fields
- May 3, 2019 4.2 Optimizing Image Files Before & After Uploading
- Apr 3, 2019 4.3 On-Page SEO
- Mar 3, 2019 4.4 Understanding The Sitemap
- Feb 3, 2019 4.5 Blogging For SEO
-
5. Moving Forward
- Jan 3, 2019 5.1 Using Google Search Console
- Dec 3, 2018 5.2 Consistent SEO Blogging
- Nov 3, 2018 5.3 Adding New Content
- Oct 3, 2018 5.4 Epilogue
Copyright
© 2020-2024, All Rights Reserved
All content in this course is created and owned by me and cannot be used or sold elsewhere. Thank you for appreciating and valuing my work and experience.